Pages

29 Jun 2015

Floor grinding

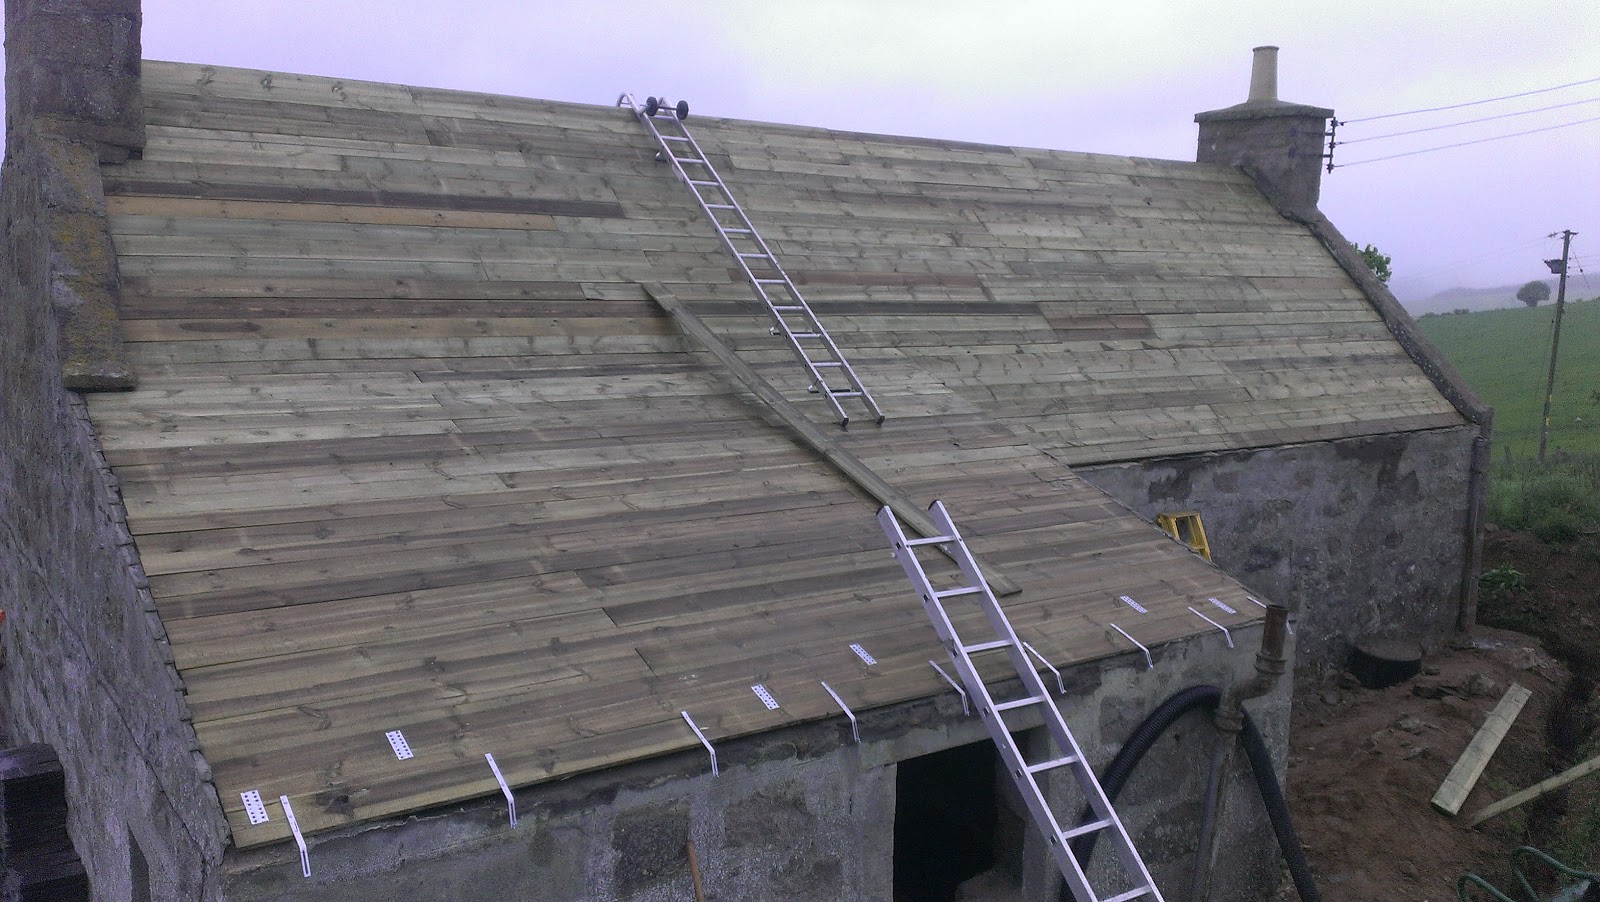
Having managed to tidy up the sarking offcuts and sawdust, Jaimin trimmed down the upstanding slab insulation using his new Bosch GOP multicutter (thanks Mum) in preparation for the concrete grinder and dust extractor which were being hired from HSS in Aberdeen.


Quite a cool bit of kit, so we were very disappointed that most of Saturday was wasted when James arrived at 12 only to find they had not included the extension leads from the 110v transformers to the machines. HSS brought them out at 3 pm which was a bit late in the day. While we were waiting James finished off the north wall head and Jaimin installed the 120mm hammer fixings in to the Velux noggins, which was pending a 120mm long 8mm bit, which had arrived during the week.

The grinder/dust extractor setup require 110v transformers. The debacle began with tripped fuses in our 13A sockets/extension leads, and nothing was going to be achieved till Sunday. After a trip to B&Q to procure some high current wire and a 45A socket (cooker switch), James and Jaimin did some electrical wizadry and got things back on track. The home electrics worked all day...


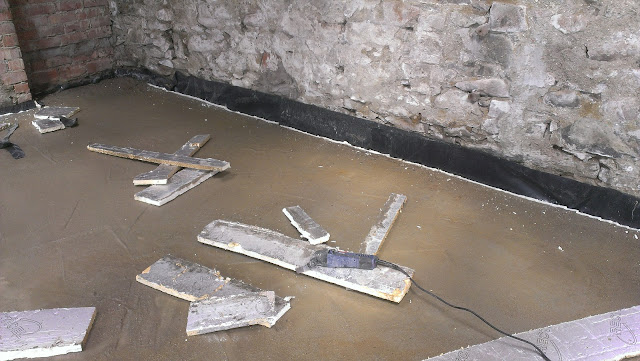
Soon after, one of the transformers tripped so the job was continued with just the grinder. This went ok but required the addition of water to the slab to avoid a dust bath, but resulted in a thick creamy concrete goo-sludge that was very hard to get up and off. Some brushing, scooping and wheel-barrowing was required.


James, when not helping with this, was starting on the south side wall head cement job.

When the 2nd transformer tripped, some troubleshooting pointed to the plug fuse which we then replaced. The other transformer was also brought back on line by resetting a relay,  albeit a bit late. The job re-started for a short time, then Jaimin decided to check the "long lasting diamond insert" grinder bits. It was pretty disappointing to see that they had worn out after 3 hours... So the job stopped and James helped pack up until some more inserts could be brought in on Monday.

Jaimin made up some Roundup weed killer to get out and spray the huge and over powering nettles... A slow and frustrating (and expensive) weekend.... Hope to have some better news soon.

24 Jun 2015

Sarked

The weather has been a tedious bore, not often mentioned but ever present. It's supposed to be summer so the blog has a new background. Hope it brings you some sunshine.

Monday saw Jaimin making the most of the Paslode and the summer daylight hours, getting 90% of the sarking completed.


Tuesday he was joined (again) by the up beat James, who finished off the sarking (he just wanted to play with the nail gun) while Jaimin chatted a few things over with a local joiner. This was the first joiner to visit site and he seemed suitably accepting of the work... he is going to price for the staircase.

Once said joiner had been mined of knowledge, James & Jaimin had to build up the wall head on the north side with some mortar, to enable a straight line along which a "bell-effect" sarking board can be applied by nailing it to the lowest currently installed board, which will help to kick the slates slightly horizontal. To enable this, the next step will be finishing off the wall head, installing the gutter brackets, then the strip of "bell" sarking and finally the membrane.


Jaimin also installed the lean to gutter brackets and then thought to nail in some nail plates with twist nails to join the lowest 3 boards together. The weight of snow could rip off the gutters, with their brackets and the lowest board, since the lowest board's nails didn't have much rafter to bite in to. With 3 strips of board together this should be much stronger.


There is still a small piece of frame building/sarking to be done on the lean-to / main roof join, where we think we will create a valley to the gutter.


The inside now looks more like something you can imagine being a dwelling.


21 Jun 2015

Old School Slates

Saturday involved Jaimin doing a bit of housekeeping in the barn "store room", then doing some patching up / cementing on the loose stone on the wall head of the lean-to and the east gable.  The existing lime based mortar is highly friable and the more you remove the more comes off, so it's a gently gently approach to get to a point where you can add some cement based mortar. This went relatively well,  although perhaps it's not pretty.


Next Jaimin had to think about the join where the west side of the lean-to roof meets the main wall (1st photo) because previously we had a chimney there (the liner is visible in the photo) but since removing it on safety grounds we will have to build up some kind of timber frame to make up for missing wall so we can slate and water-tight it. Hopefully.

A few bits of C16 were subjected to the mitre saw with a 20 degree cut, and hey presto a half lap joint was screwed in to the trusses with a few of the Simpson structural screws. A rafter extension was then cut and added on. The bathroom sarking was then completed.


Otis's birthday party at the McMillan's was a welcome lunch break, and a minor miracle occurred when Sasha's brother in law, a tattie farmer in Forfar :-) offered us his Paslode IM350.... There's enough behind  the detail in this story to fill another post so believe us when we say it was good timing.

Sunday provided the blog title. It turns out that our cottage was slated with 7 x 11 inch slates. These are rare, because people now discard them due to their low coverage and thus their high cost of installation. Thankfully, "Brian in Carnoustie", a lifelong slater,  had a bunch which he recovered off his old school which is being torn down! They have probably been in use for over 50 years, given that Brian retires this year. Jaimin headed down with Neil's trailer and loaded them up. They look like they're a bit thicker than our ones, and mostly in decent shape... Probably a ton or so in weight, and hopefully we can renew their life....

After loading them up it was off to get the Paslode from the Forfar farm, back home (slowly) for lunch and then to the plot to unload the slates. Finally it was time to play with the very cool nail gun, which enabled some quick sarking progress on the North side.


18 Jun 2015

Half sarked

On Tuesday evening James and Jaimin put in a shift and managed to cut the out the remaining 2 roof light holes, make up the noggins and install them, then sarked a bit before dark. Jaimin also installed another couple of galvanised straps.


On Wednesday, Lucy and Jaimin met up with Peter (the architect) who paid his first visit to site. After measuring up the main house we all discussed the way forward and it began to dawn that we will have some serious decisions to make for the Building Warrant package.
James came by again and the sarking got going and he and Jaimin completed the south facing roof.


15 Jun 2015

Roof Structure & Sarking Progress

Since lining up the apexes on Monday Jaimin had been back to mix up mortar to level the wall head of the lean to in preparation of the rafter and wall plate installation. (No photo as his phone was dead).

On Saturday he and Ali began by measuring up the wall plate, installing a DPM then fixing it using Thomas's SDS hammer drill to install hammer fixings along its length at 400mm centres. While Ali installed the wall plate, Jaimin measured up and prepared the rafters which required an awkward and probably not very well made reverse birds-mouth cut. These were cut in to the 3.6m lengths of C16, after determining the angle of the lean-to.


Oli arrived mid afternoon and boosted the team so to keep efficiency high, he and Ali began sarking the south facing roof while Jaimin prepared the rafters. Once all the rafters were cut and membrane stapled to the masonry-bearing part, Oli & Ali were called off the roof and together they installed all the rafters using the Simpson structural wood screws.


On Sunday Jaimin and Ali were on site. To begin, Ali re-commenced sarking while Jaimin made up some shims and supports to go under the rafters, to support them on the wall bearing part. After this he made up 2 sets of double noggins for the impending Velix roof lights. They unpacked the first Velux, quite a moment!


The *** BDX collar
Installation appeared much more complicated than anticipated (mainly due to the manuals) and caused a lot of discussion. It transpires that despite everything in the building world requiring 600mm centres, and SK06 Veulx being 1140mm wide and therefore fitting between the 600mm centered trusses, they require an extra 40mm width to accommodate its "BDX Insulation Collar". Despite having bought this BDX collar thinking it was very important it appears to be not much more than an engineered bit of insulation that wraps around the Velux frame so can probably be replaced by expanding foam :-). Certainly better than cutting out a truss length and fiddling, we think.
After a lot of measuring the first single truss was cut with the circular saw, and a noggin was installed before lunch and Ali having to head away.

Jaimin managed to find a way to make the second cut of the truss and install the top noggin as well, which was not easy without support. Once done, some more time was spent interpreting the substandard Velux manuals.


After it was determined that no decisive progress was to be made on this front Jaimin went ahead and installed 4 galvanised tie down straps on the north wall wall-plate using hammer fixings into the wall, and twist nails in to the wall plate, to keep the roof tied down nice and snug.


After they were installed he decided to do some sarking on the lean to, which uncovered a decidedly incorrect spacing on one of the rafters. He then had to spend a good while remeasuring, removing screws, realigning and spacing, and reinstalling screws, before attaching all the truss clips with twist nails. Frustrating but good to have caught early.

Sarking then went ahead over the lean-to, which was abandoned at 7.30pm.


A long weekend with some more progress, we hope, in the week to come. 

10 Jun 2015

Apex line up

Due to the insane wind on Saturday and despite our efforts, we realised that our apexes were off center for many of the trusses. Perhaps not the biggest problem, but being in the category of "not too hard to fix" and "not sure what future ramifications this will lead to" we decided to re-align them.

Jimmy and Jaimin headed out on Monday night and got a system going (Jimmy removing the twist nails from the trusses, Jaimin undoing bracing and then positioning the apex along the string line.

All done - all straight. Good.


8 Jun 2015

Truss weekend


The weekend proved to be:
  1. Really really really really really windy on Saturday
  2. Productive, fun, tiring
Jim & Lil came to stay this weekend so we had great company. On Saturday morning James P had offered himself as an early starter so he and Jaimin met on site at 7.15. The first few trusses took a while and were massively hampered by the wind blowing the apex string off center, which proved impossible to resolve despite spending a lot of time on.
At around 10.30, Jim arrived and after a brief "handover" with James, got properly stuck in. The wind battered them all day, with grit in the eyes being a major issue. 


Jim the joiner - scary fella
 Jaimin's new Makita cordless impact driver was on show, and proved to be an excellent tool helping to make the structural wood screws sit flush in the newly made double trusses. The girls and children delivered an exemplary lunch (best soup ever, according to Lil) to refuel the boys, and Lucy even did some impact driving!
Lil & Finn, just chillin'
Jack hiding from the wind
Lucy teaching Jaimin how to use the impact driver
Saturday ended with making the final double, then heading (wind blown and tired) home.


Sunday was a more reasonable start - 10 am - and included Jimmy as well! Good teamwork meant that the faff of un-securing, laying down, sliding, lifting and re-securing trusses to the east gable, to allow us to restart the main line of trusses in order, was efficient. By the time the lunch delivery arrived with the families they were all done.


Having braced the internal side of the rafters with angled sarking, we downed tools to have a picnic, and less than 5 minutes later a proper shower came through forcing us in to the barn for lunch! At least we had a view.
Truss erection done

Heavy shower, retreat to the barn...
After lunch we headed up the hill to explore the fishing loch behind the plot which we've known about but never visited. A beautiful little place, perfect for a stroll and a sunny afternoon and made even more fun by some old stone ruins nearby for the kids to play on/in.

The ruins are in the background.

A phenomenal effort from Mr Lusty, transforming himself in to Jim the Joiner within minutes of arrival. His name is added to the list of contributors that will be "etched in to the fabric" of the cottage. Thanks Jim!


4 Jun 2015

Erecting the first trusses

Yesterday evening Ben made his debut on site as a workman alongside a returning James. Here he is admiring his early contribution:

The plan we are aiming for is something like this:


James, Ben and Jaimin got all the trusses in to the building and then commenced with fixing a few in to place using Cullen FAS Framing Anchors for the doubles and Cullen TC truss clips for the singles. The first was a double and being a bit heavy there was some deliberation on how to swing it up in to place. After making a "pushing pole" for James to use, Ben and Jaimin ascended the walls and heaved it up in to place before fixing it to the pre-installed braces on the gable. Lots of measuring, checking, plumb-lining, squaring and fiddling eventually resulted in 4 framing anchors being nailed in with square twist nails. The process was repeated and lots of measuring took place. Eventually we managed to erect 2 doubles for the stairs and the west side of the west rooflight, and 2 singles.